
Get to know your Cube
First Things First. you must know the names of the different pieces of the Cube.
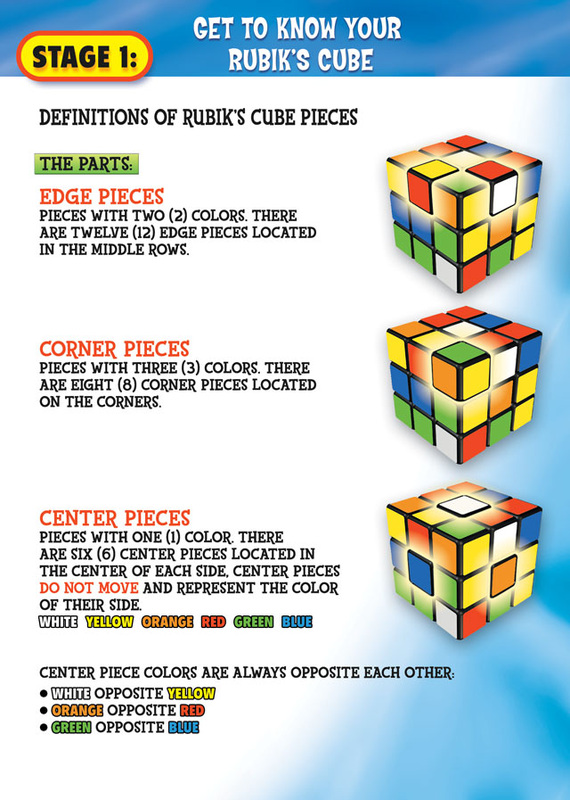
If you are unfamiliar with the names check the image right.
If you are unfamiliar with the names check the image right.
Move Notations
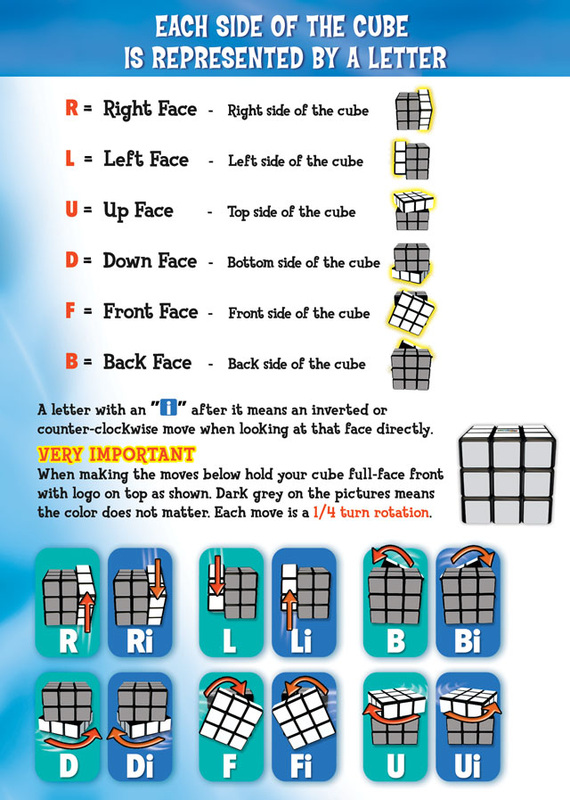
In order to be able to solve the Rubik's Cube you must be familiar with Internationally known Move notations that allow you to understand the algorithmic steps - ones that have known results on the Cube's configuration - involved in " ABM " in order to carry them out correctly.
If you are unfamiliar with the Cube's Move Notations Check out the image right.
If you are unfamiliar with the Cube's Move Notations Check out the image right.
Step 1: The White Cross
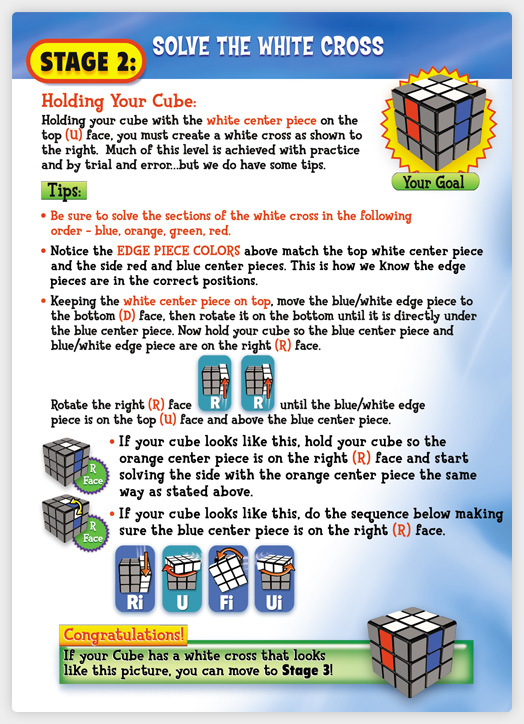
The first step involves doing a white cross - like many other methods of solving the cube. You must arrange the white-colored edge piece of every color in a way that arranges the white part with the white face and the colored part with its face.
If you are unfamiliar with that step check the image right.
If you are unfamiliar with that step check the image right.
Understanding "ABM"
Some of you guys are here for this step onward since you might already know everything mentioned previously. Let's start.
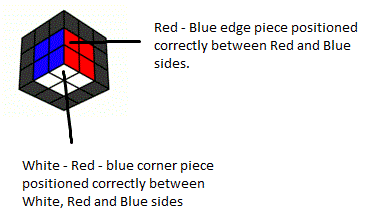
To start with we must understand this method before initiating in any of its steps. As many of you have guessed this method involves forming a Bi layer of pieces - an edge piece along with a corner piece - rather than doing a layer by layer in a way that arranges the corner piece positioned correctly between the Face color, bottom color and side color and the edge piece positioned correctly between the 2 side colors. Check image on right.
To start with we must understand this method before initiating in any of its steps. As many of you have guessed this method involves forming a Bi layer of pieces - an edge piece along with a corner piece - rather than doing a layer by layer in a way that arranges the corner piece positioned correctly between the Face color, bottom color and side color and the edge piece positioned correctly between the 2 side colors. Check image on right.
Step 2: initiating with "ABM"
After you have made your white cross, hold the cube so that the yellow side is on top and the white side is down. Check image right.
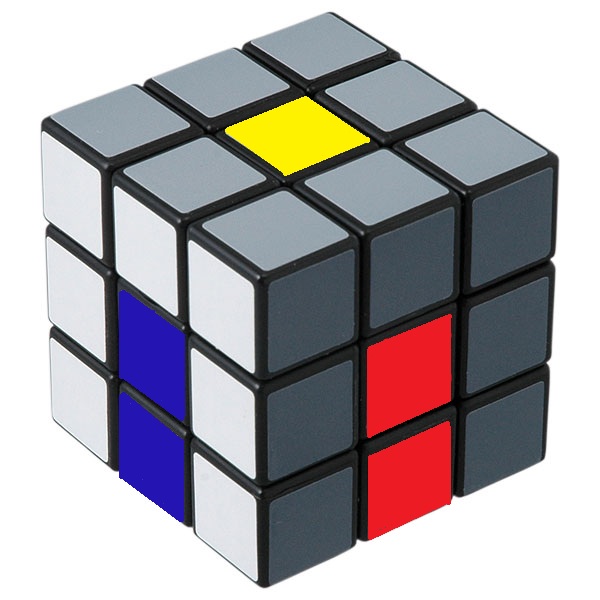
Step 3: Locating a white corner piece
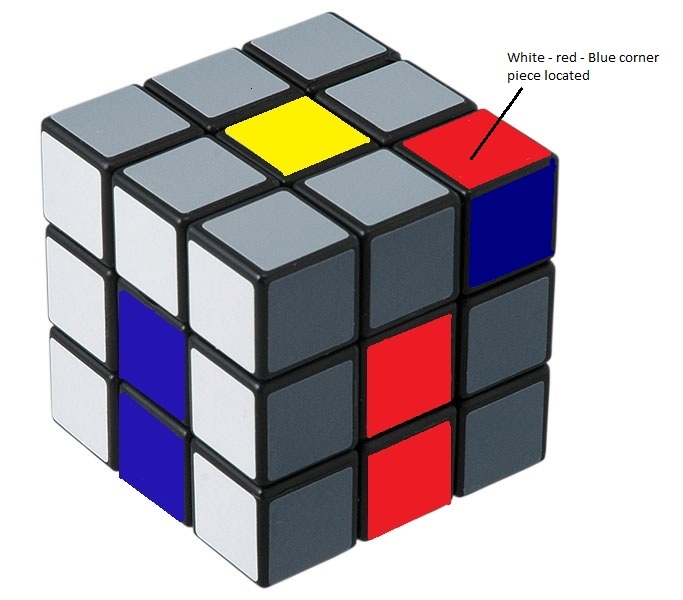
locate a white corner piece positioned in the top side of the cube or Up face with a white color.
Check image right.
Check image right.
Step 3 Completion
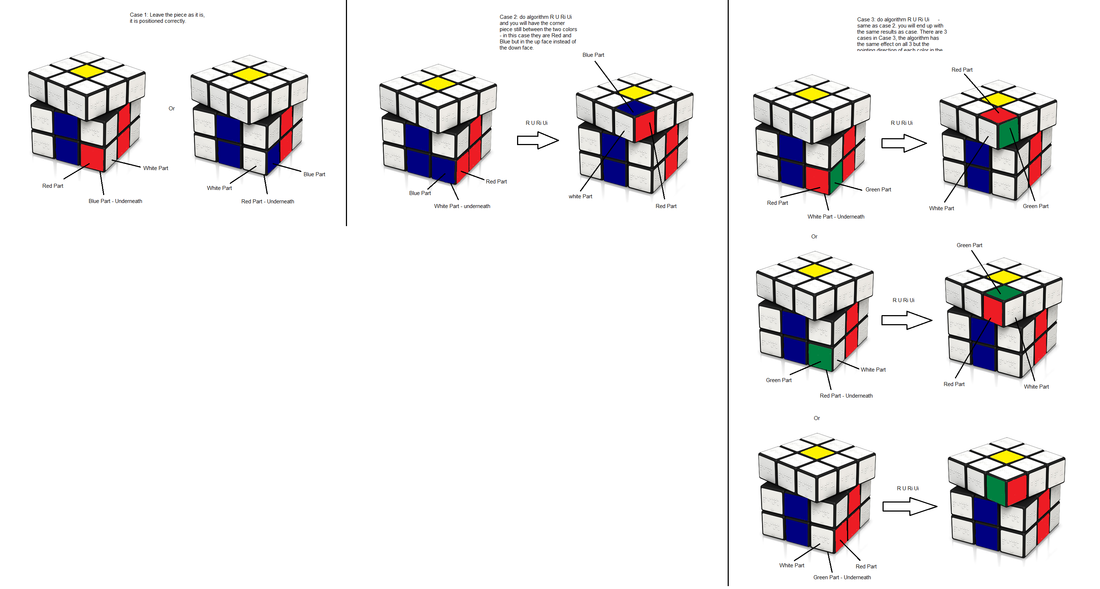
Rarely you found yourself in a situation where there are no white corner pieces in the Up face - i.e all the white corner pieces are in the Down face. There are 3 cases involving that:
1. If the white corner piece is positioned correctly between the two colors - with the white corner piece - AND the white part IS NOT pointing downwards - any pointing direction other than downwards - don't move the piece , it is correctly positioned.
2. If the white corner piece is positioned correctly between the two colors - same as case 1 - but the white part was pointing downwards, face the left color of that piece - for example if it was a Blue - Red - White piece face the Blue part - and do the following algorithm: R U Ri Ui. Afterwards you should be having that piece still between the two same colors but in the Up face instead of the Down face. Note that you don't need to worry about where each the of 3 colors of the corner piece are pointing at afterwards.
3. If the white corner piece is positioned incorrectly such as having the Red - Green - White corner piece between the Red and Blue colors - with the white pointing at any direction - do the following algorithm: R U Ri Ui. This is the same algorithm used in case 2 and has the same result.
Check image right for all the previous details.
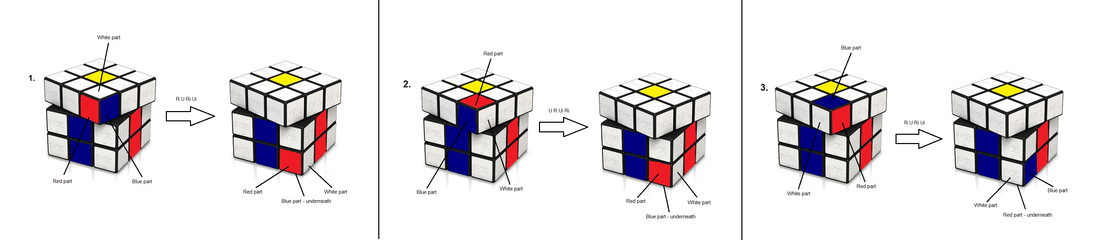
Step 4: Corner piece position correction "CPPC"
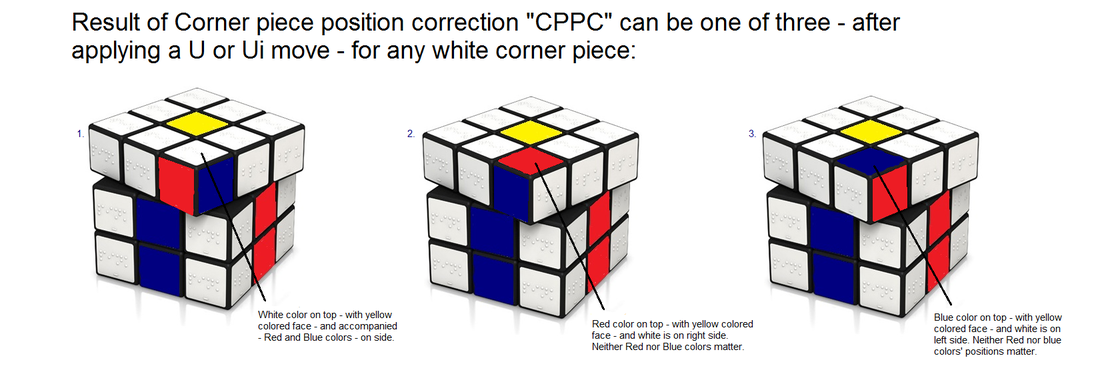
After you had located a white corner piece in the up face layer or have changed a white corner piece's position from the down face to the up face, identify the two other colors - we call them the accompanied or associated white colors - along with the white color on that white corner piece. For instance, the Red-Blue-White corner piece has Red and Blue accompanied or associated white colors. Then correct the position of the corner piece by applying a U or Ui move so that it lies between the accompanied face colors. Your corner piece after correction should look like one of these three: (From now on all my EXAMPLES will be of the Red and Blue colors which apply to all the other colors)
1. White on top - with the yellow colored face - and red and blue are on sides.
2. Red on top - with the yellow colored face - and white is on right side.
3. Blue on top - with the yellow colored face - and white is on left side.
What really matters after the "CPPC" step is the position of the white color in the corner piece - Not the position of the accompanied colors.
Check image right.
Step 5: Corner piece position Translation "CPPT"
Some of you might have came across the word translation during a math course - Transformations.
This step involves translating/moving the white corner piece after "CPPC" from the up face into the down face according to the position of the white color in the corner piece as follows:
Note that you must always face the colored FACE that is on the left of the other. For instance before "CPPT" of the white-Red-Blue corner piece you must face the blue colored face not the red colored face. Before "CPPT" of the white-Green-Orange corner piece you must face the green colored face not the orange colored face. etc...
1. If white color on top after "CPPC" apply the algorithm R U Ri Ui.
2. If white color on right - i.e red color on top - after "CPPC" apply the algorithm U R Ui Ri.
3. If white color on left - i.e blue color on top - after "CPPC" apply the algorithm R U Ri Ui - same as 1.
Some of you might notice that this is the reverse of Step 3 completion which involves translating the white corner piece from the down face into the up face in cases 2 and 3 of step 3 completion above.
Check image right.
Step 6: Locating and Preparing the edge piece
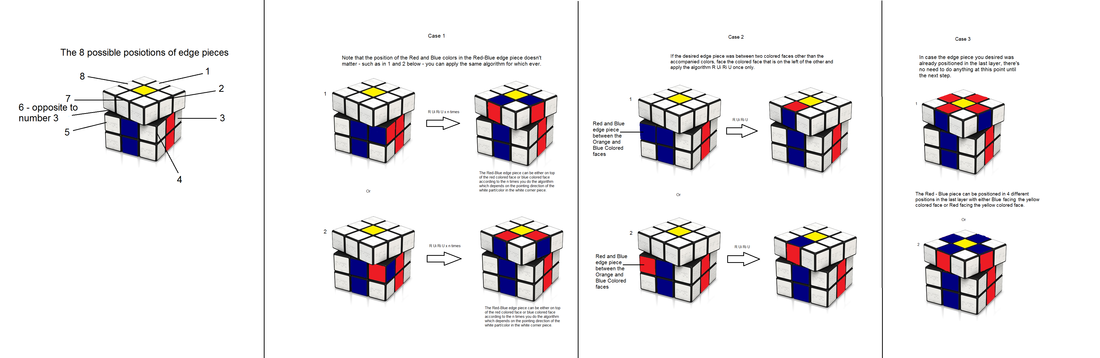
This step completely depends on the previous step - "CPPT". After you have identified the two other colors with the white color of the white corner piece - the accompanied colors - and translated the white corner piece from the up face to the lower face in "CPPT", you now start looking for the edge piece of the accompanied colors. You have 8 possible positions for an edge piece. The 4 edge pieces of the second layer and the 4 edge pieces of the last - third - layer. This move involves moving the desired edge piece - of the accompanied colors of the white corner piece that was translated - to the last layer.
Note that If your desired edge piece was already in the last layer leave it untouched - you are lucky that its position is correct.
Subsequently there are actually 3 cases to deal with:
1. If the edge piece was in the second layer in between the accompanied colors of the corner piece, such as having the Red and blue edge piece between the red and blue colored faces. In this case you apply the algorithm R Ui Ri U - while facing the colored face that is on the left of the other such as the Blue colored face between Red and Blue - n times until 2 conditions are met: first the edge piece is no longer in between the accompanied colors - it should be in the up face. Second the white corner piece should have its white part/color NOT pointing downwards - towards the white layer - it should either point to the right or left with one of the accompanied colors pointing downwards.
2. If the edge piece was in the second layer in between any two colors besides for the accompanied colors, such as having the Red and Blue edge piece between the orange and green colors. In this case you apply the algorithm R Ui Ri U once only and your edge piece should be on the up face, with the white corner piece untouched.
3. If the edge piece desired was already in the top face leave it untouched - it's positioned correctly.
Check image right.
Step 7: Edge piece position correction "EPPC"
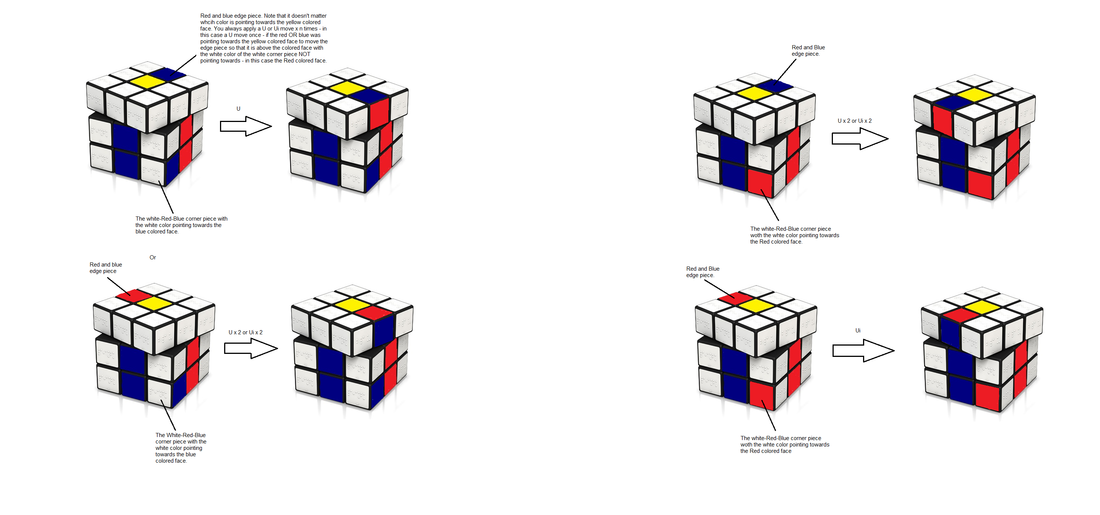
After we had done "CPPT", identified the accompanied colors of the white corner piece, located the position of the accompanied colors' edge piece - the desired edge piece and moved it to the up face. you now need to move the edge piece from its position into above one of the accompanied colors' faces - in the up face.
First you must check the pointing direction of the white color in the white corner piece. You must then apply a U or Ui move x n times to move the edge piece above the colored face with the white color of the white corner piece NOT pointing towards. For instance if the white corner piece - with Red and blue accompanied colors - with its white color pointing towards the blue colored face, move the Red and blue edge piece applying a U or Ui move so that it becomes above the red colored face - simple.
Check image right.
Step 8: Bi layer position translation "BPT"
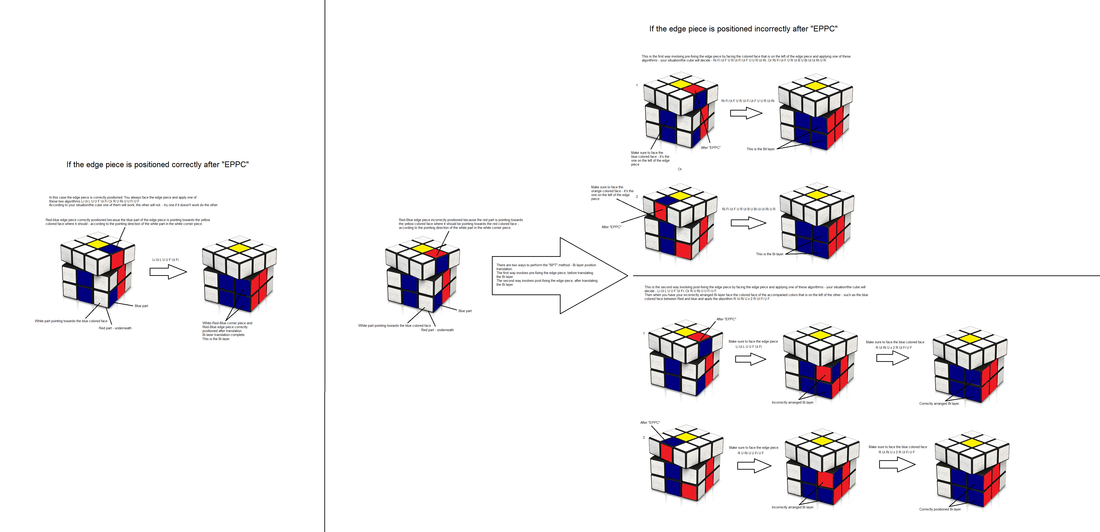
There are two ways in which you can apply this step.
The first way involves pre-fixing the edge piece - fixing the edge piece BEFORE initiating this step.
The second way involves post-fixing the edge piece - fixing the edge piece AFTER initiating this step.
You can do either or according to your preference.
The first way: this way depends completely on the colored face - of the accompanied colors - that the white color of the white corner piece doesn't point towards. For instance, if it was the red color then the blue color of the edge piece should be pointing towards the yellow colored face - after "EPPC".
If the edge piece was arranged correctly after "EPPC" face the edge piece and apply the algorithm Li Ui L U U F Ui Fi. Or R U Ri U U Fi U F
If the edge piece was not arranged correctly after "EPPC" - such as in the previous example explained above having the red color of the edge piece pointing towards the yellow colored face - you face the colored face that is on the left of the edge piece and apply the algorithm Ri Fi Ui F U R Ui Fi Ui F U U R Ui Ri. Or Ri Fi Ui F U R Ui B U Bi Ui Ui Ri U R.
Note that only one of the two algorithms will only work according to your situation/the cube, so try one if it doesn't work then the other will do the trick.
The second way: this way is more preferred to be done - the first way might not be understood well. After you had done "EPPC", whether or not the edge piece is positioned correctly face the edge piece and apply the algorithm Li Ui L U U F Ui Fi. Or R U Ri U U Fi U F.
Note that only one of the two algorithms will only work according to your situation/the cube, so try one if it doesn't work then the other will do the trick. Now in the case of accompanied colors Red and Blue - i.e a red and blue edge piece - the red color of the dege piece should be pointing towards the red colored face and blue color towards the blue colored face, if the opposite, face the colored face that is on the left of the other - which is blue between red and blue - and apply the algorithm R Ui Ri U x 2 R Ui Fi U F. This will fix the pointing directions of the edge piece.you
Check image right.
Step 9: The yellow cross
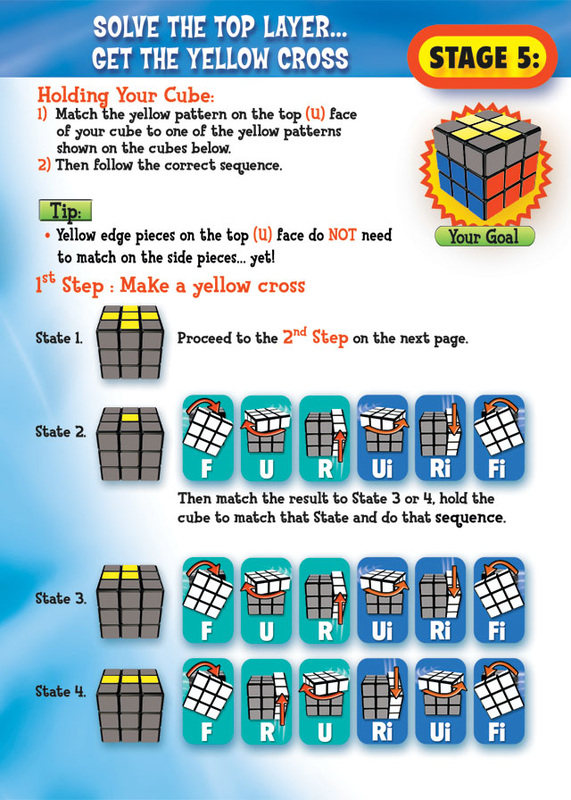
Check image right for all details.
Note that if the yellow cross was already done for you proceed to step 10.
Note that if the yellow cross was already done for you proceed to step 10.
Step 10: Completing the Top/yellow layer
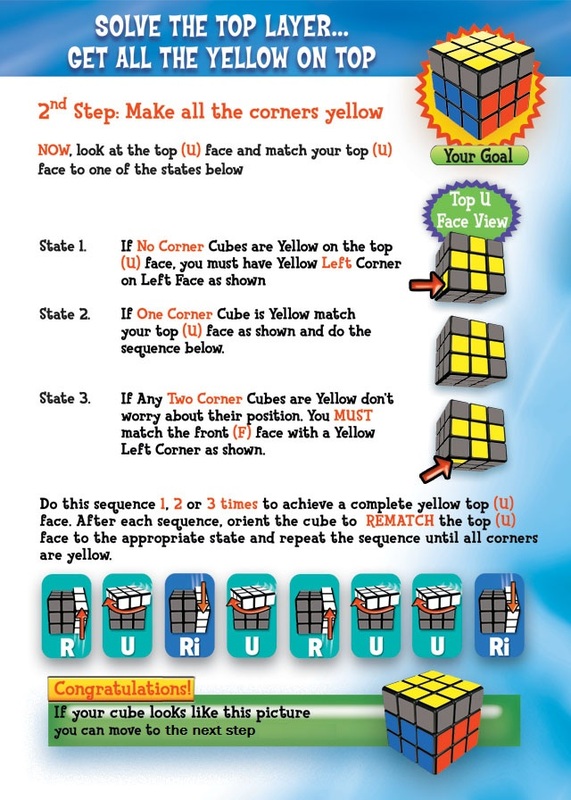
Check image right for all details.
Step 11: Positioning the yellow corners correctly
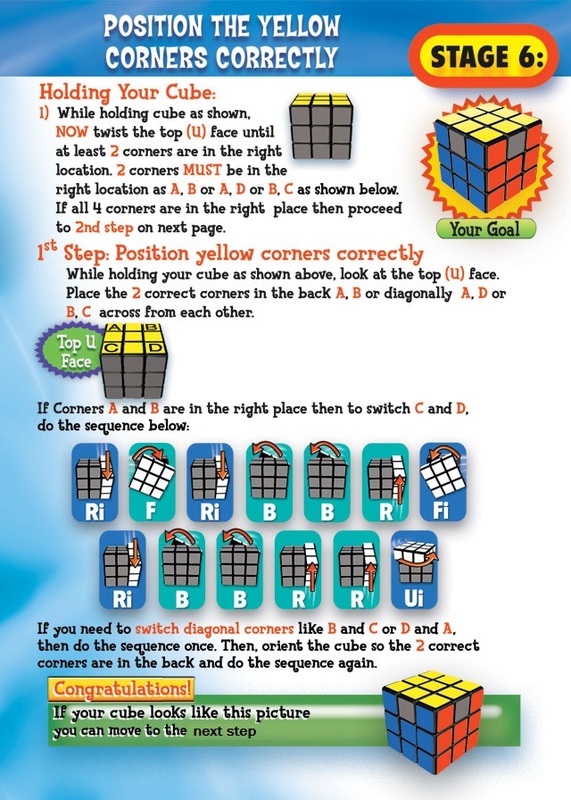
Check image right for all details.
Step 12: Positioning the yellow edge pieces (The final step)
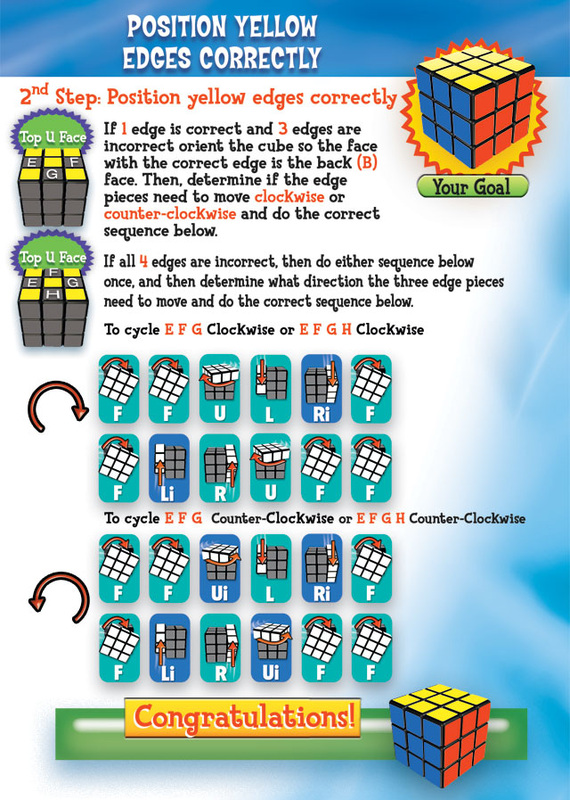
Check image right for all details.
Step 13: Congratualtions
Hold alt+F4 and go brag.
For any enquires contact me at - right below
